Friday, December 31, 2010

Blue Cheese and Jam Savories


I have an inability to connect the dots that's almost masterful sometimes. Take for instance these blue cheese savories. I test drove this recipe earlier in the week, after lusting over it since Food52's post a month ago. And it did not disappoint -- these are amazing. Truly. The cookie itself is salty and savory, piquant with blue cheese, and counterbalanced with a dollop of tart jam. And, as an added bonus, it has a delightfully short and flaky crumb (and is easy to make, with just a handful of ingredients). It's like the most elegant Cheez-It ever, the best of a cheese plate (cracker, cheese and preserves) all in one tiny little mouthful. This is a recipe that practically screams "I am your New Year's Eve party appetizer!" I sent messages to everyone I know telling them to make this cookie. And yet, I still managed to putter around my keyboard the past day or so, wondering whatever should I write about this week. Sigh. See what happens when I forget to take photos? Out of sight, out of.... Sorry, what were we talking about?

Although 2010 draws to a close tonight, hopefully some of you are laggards like me, and are still mulling over what to bring to your New Year's parties. And if these don't get made tonight, put them on your list for 2011.


Blue Cheese and Jam Savories

from The Runaway Spoon, via Food52
yields ~4 dozen cookies


The initial recipe called for fig jam, but I've now made this with three types of jam, and all were delicious. I'd recommend something on the slightly less sweet side, such as fig, apricot or pear. Also don't worry that the recipe doesn't call for salt -- the salt in the cheese will be enough.


1 cup flour, plus additional for rolling
1 stick (1/2 cup) butter, softened to room temperature, and cut into a few chunks
4 oz crumbled blue cheese (this was a scant cup for me, but the volume may vary)
ground pepper
~1/4 cup jam

Place the flour, butter, and blue cheese in a food processor, and top with a few grinds of black pepper. Pulse a few times, until both the butter and cheese are reduced to small bits. Do not over-process. Turn the dough out onto a bowl, and squeeze and fold it until it comes together (alternately, you can continue to process the dough in the processor until it comes together, then just turn it over a few times on the counter to finish the process, but I like to prevent over-processing and ensure flakiness with the other method). If you have a particularly moist blue cheese, you may need extra flour (I was working with a particularly dry cheese). Cover with plastic wrap or waxed paper, and chill it for half an hour (this step is optional, but I think it makes the dough nicer to work with).

Preheat your oven to 350 degrees.

Let the dough warm up a few minutes if chilled, and roll out on your floured countertop to a thickness somewhere between 1/8"-1/4". Cut out circles with a 2" cutter (you can use a smaller one if you favor wee savories, which will yield more cookies). Place the rounds on a cookie sheet (they'll spread a bit, but not too much -- more if the dough is warm). Make a small divot in the center, with your finger or the back of a measuring spoon or whatever you like. Fill the divots with ~1/4 tsp jam (I think I used more), and bake the cookies until the jam is bubbling and the cookies are just beginning to color, ~10 minutes. Let cool on the sheet for a few minutes, then move to a rack (or your mouth).

Friday, December 24, 2010

Kashmiri Chai


After all those latkes, I almost left without giving you a proper Christmas present. Though it's not for lack of trying. I spent a boozy evening trying to concoct a perfect hot toddy, full of ginger and brandy and just a hint of pear. You'll hear more about this if and when I actually get it right. But that hasn't happened yet--I ended up with cloyingly sweet concoction, a sticky counter, and a container of poached pears that are still knocking around my refrigerator. So rather than admit full defeat and leave you without a warm beverage to cozy up with on these cold nights, I turn to a cup of chai instead.

I printed another chai recipe about a year ago, one that I freestyled with a smattering of spices and a good long simmer. I still adore that version. But this Kashmiri chai--wow. It is my new best friend. It's got a surprisingly complex flavor from the sweet-yet-savory combination of saffron and cardamom, perking up a milk-brewed sweet tea. And as a bonus, it's ready in just a couple of minutes. Happy Holidays!

Kashmiri Chai

adapted from this recipe from Portland's Bombay Cricket Club
yields 2 cups of chai

2 cups milk
2 Tbsp loose black tea (any standard orange pekoe tea works fine)
1 tsp ground whole cardamom pods (blitz them in a spice grinder until they're reduced to small bits--you can substitute a smaller amount of ground cardamom seeds, but the whole pods contribute a unique flavor)
1 small pinch saffron
4 tsp sugar

Place the milk, black tea, and ground cardamom pods in a saucepan, and bring to a boil over high heat. When it boils, add the saffron and sugar, and reduce the heat until it's just high enough to maintain a simmer. Simmer for a couple minutes, then strain into two glasses and enjoy.

Monday, December 13, 2010

Old-Fashioned Scones


At some point in my childhood, I developed the theory that when I was Grown Up, I would buy myself a container of frosting for my birthday and eat the entire thing. This plan makes me slightly ill to contemplate, and I'm not sure where it came from--I didn't even have too much experience with pre-made frostings. But somehow this act embodied the Best Present Ever to my little mind: someday I was going to get myself exactly what I wanted, and ain't no man (or, more accurately, mom) could hold me back.

Little did I know that when I finally had enough agency and income to act on this plan, my desperate need for sugar would be gone. It's a sad fact of adulthood. Don't misunderstand me, I still like a good sweet now and then (as the ample presence of cookies and cakes and tarts on these pages can attest). But setting aside the obvious hydrogenated shortcomings of a container of Betty Crocker, the sad truth is that I only crave sweets for dessert, not for the bulk of my meal.

This is especially true at breakfast. I am all eggs and potatoes, beans and cheese, looking on in confusion as other diners order almond french toast and pumpkin waffles. I can't imagine feeling satisfied with that dessert-for-brunch approach, but I do covet a taste -- just enough to give my meal a sweet little coda. This is where a small scone like this is absolutely perfect.

If you've ever wondered what the whole scone hoopla is about, these will answer your question. They're delicately flaky, like a biscuit, and just sweet enough to satisfy. Oats and cornmeal add a nubby edge of whole grains (and a slight earthy sweetness of their own), and buttermilk adds just a bit of tang. I'm especially fond of making these with punchy dried sour cherries, but really any sort of dried fruit would work nicely. And although my seven-year-old self wouldn't believe me, I swear it's way better than a jar of frosting.


Old-Fashioned Scones

Inspired by the scones of the same name from the Baker's Cafe, though this noodled variation is pretty much all my own. As with other pastries, a light touch in mixing yields tender scones.

yields ~10 small scones (you'll probably want to double the recipe if you're cooking for any sort of crowd)

3/4 cup rolled oats
1 1/4 cup flour (can swap out some ww pastry flour if desired)
1/2 cup cornmeal
1/2 tsp salt
1 tsp baking powder
1/4 tsp baking soda
1/4 cup sugar, plus additional for sprinkling
1 stick cold butter, cut into tablespoons
1/2 cup dried sour cherries, or other dried fruit
~1/2 - 3/4 cup buttermilk
1 egg, beaten with 1 Tbsp milk or water (aka the egg wash)

Preheat the oven to 400 degrees, and grease or line a cookie sheet.

Place the oats in the bowl of a food processor, and pulse until they're blitzed to a mostly floury powder, with a few bits here and there. Add the flour, cornmeal, salt, baking powder, baking soda, and sugar, and pulse until evenly mixed. Add the cold butter, and pulse a few times until the largest pieces of butter are about oatmeal-sized -- do not overmix. Turn the mixture into a bowl. Add the dried fruit, and stir until combined. Add the buttermilk until the dough comes together -- it will be moister than pie crust, but try not to add so much buttermilk so that it becomes gloppy. Form the dough into a cohesive mass, and turn out onto a lightly floured countertop.

Roll the dough out to a thickness of 1", and cut into circles with a 2.5" cutter. Place shaped scones on the tray, and lightly mush together and re-roll the scraps until you've formed all the dough. Brush the tops of the scones with the egg wash, and sprinkle with a light dusting of sugar (you'll just need a few spoonfuls for the whole tray). Bake ~15-20 minutes, until they are starting to get lightly browned. Let cool on a rack and enjoy.

Monday, December 06, 2010

Gluten-Free Vegan Rugelach


A gluten-free diet can present its own set of hurdles. But to be gluten-free and dairy-free? Those folks have it rough. I feel for them. And when I feel for someone, generally I want to bake for them as well.

These rugelach are admittedly something of cheat. I realized I had no hope of adapting my favored sour-cream-and-butter rugelach dough, and futzed around a bit with the alternatives. Sure, I could use some soy-based sour cream, but those tend to have a weird soy flavor I'm not really down with, overpowering any of the nicely cultured tang they contribute. So instead I looked towards vegan/gf pie crust instead, to capture rugelach's essential flaky delicacy. I took a stellar gf vegan crust recipe and tweaked it according to my own tastes (and, to be frank, the particular mix of gluten-free flours that I happened to have in my pantry and a slight misreading of one section), and then slathered it with my favorite rugelach filling of apricot jam, walnuts, and liberal shaking of cinnamon and sugar (this was added to the filling, rolled into the dough itself, and for the sake of overkill, sprinkled on the finished rugelach before they hit the oven). The resulting cookies did not disappoint.

These rugelach will win anyone over, regardless of their dietary restrictions. They're flaky and delicate, and easily capture the European-tea-cookie soul of the recipe. The tender crust wraps around the sweet-but-not-too-sweet filling, creating a something like a tiny tart. The jam may leak out a bit and make a mess (as it does in the buttery, wheaty original--parchment or silpats are especially nice here), but becomes deliciously caramelized to give the cookies a sophisticated edge. Sadly it's my final Hanukkah present to you, but it's a pretty sweet parting gift.

Gluten-free and Dairy-free Rugelach

dough inspired by Gluten-Free Girl's piecrust (albeit adapted heavily), filling inspired from my childhood rugelach memories
yields 32 small cookies

Although it's gluten-free, this dough is fairly forgiving. The only bit of fuss is that it is a bit soft and sticky (which might also have something to do with the copious amount of fat involved), so rolling it out between parchment paper or plastic wrap (or, if you're me and have run out of the former, a cut-open plastic bag) is something of a necessity. And, as with most gf recipes, if you've the means to do it, it's best to go with the weights rather than the volume measurements.

Dough:
scant 1/2 cup (2 oz) cornstarch
2/3 cup (2 oz) garbanzo bean flour (this will have a weirdly beany taste in the dough, but will bake off in the finished product -- you can swap out sorghum if desired)
1/3 cup (2 oz) potato starch
1/2 cup (3 oz) rice flour
1 tsp xanthan gum
1/2 tsp salt
1 Tbsp sugar
1/2 cup (aka 4 oz, aka 1 stick) non-hydrogenated (need I say it?) shortening, such as palm shortening, cut into several pieces
1/4 (aka 2 oz, aka 1/2 stick) cup non-dairy margarine (or use all shortening), cut into several pieces
~1/4 cup - 1/3 cup cold water, as needed

Filling:
2/3 cup apricot jam
2/3 cup walnuts, chopped into fairly small bits
2 Tbsp sugar mixed with 1 tsp cinnamon

In a food processor or large bowl, mix together the cornstarch, bean flour, potato starch, rice flour, xanthan gum, salt and sugar (aka all the dries). Cut or pulse in the shortening and margarine until the largest bits are about the size of rolled oats -- don't overmix! If you're using a food processor, turn the mixture out into a bowl at this point. Add the cold water, bit by bit, mixing it around with your hands, until the mixture is moist enough that it comes together easily when you pinch it. Turn the dough over a time or two (aka knead very lightly), just until the elements are dispersed evenly and the dough coheres. Underkneading is better than overkneading. Divide the dough in two, and shape each bit into a chubby disk. Cover with plastic wrap or parchment (or tuck into a plastic bag, and refrigerate at least 1 hour.

When your dough has chilled, preheat your oven to 350. Line two cookie sheets with parchment or silpat liners.

Take out 1 disk of dough, leaving the other in the refrigerator. Lay out a sheet of parchment or plastic wrap, and sprinkle it lightly with the cinnamon sugar mixture (use ~1 tsp total). Place the dough on top, and sprinkle with additional cinnamon sugar. Top with another sheet of parchment or plastic, and roll out between the two until you have a circle that's ~11 inches in diameter. Spread the dough with half of the jam, sprinkle on half the walnuts, then sprinkle with a teaspoon cinnamon sugar.

Now comes the cutting and rolling! Taking a chef's knife or pizza cutter, divide the dough into 16 equal sections (just cut in half, then quarters, then eights, etc.), taking care not to slice up your countertop. Starting at the wide outer edge, roll each section towards the center to form an adorable little roll (you may need to lift the parchment/plastic to guide the cookie, so that it rolls without breaking at first). Place each cookie on the prepared sheet, making sure that the end is pinned underneath so that it doesn't unroll. When you've shaped all the cookies, sprinkle an additional teaspoon full of sugar over the tops of the cookies (that's ~1 teaspoon for the whole tray, not 1 per cookie). Place the tray in the freezer, and repeat the process with the remaining disk of dough.

After the dough has chilled for ~15-20 minutes (about how long it takes to roll, fill and shape the next batch), take the cookie sheet from the freezer and place it in the oven (and place your second sheet in the freezer for the same amount of time). Bake until the filling is bubbling and the crust has lightly colored, ~30 minutes (if the spilled jam is darkening too much at the base, move the sheet to a higher oven rack). Let sit on the cookie sheet for a minute or two, then move to a rack to cool completely. These are best devoured the day they're made, or stored in the freezer.

Tuesday, November 30, 2010

Classic Latkes


It's back-to-back latkes! I'd apologize for the lack of variety, and for the fact that I'm yet again shunting you to another website to get the recipe (this time to The Oregonian), but honestly I'm too busy trying to avoid skinning my knuckles on the box grater to care. Hannukah starts this week, people! Where did that come from?

In addition to preparing for our own household celebration, I'm busy filling our freezer with a small army of potato pancakes for our annual Latkesplash party. I'll probably also make a batch of ruggelach, and a pot of matzo ball soup to warm people up (and round out the Taste of Ashkenaz sampler). But, as the party title suggests, it's all about the latkes. And my latkes, they are delicious. Check out the story here, and learn how to make simple latkes stellar.

And as a bonus, I toss out another oil-themed tidbit: a recent radio story I produced on Oregon farmers who are trying to grow olives. Happy Hanukkah!

Monday, November 22, 2010

Sweet Potato Parsnip Latkes with Feta and Leeks


Sometimes I give myself ideas by accident. A few weeks ago I was writing an ode/guideline to the classic potato latke for our local paper. I wanted to sing the praises of simplicity, contrasting its potato perfection against all the ridiculous, nouveau-what-have-you variations. So I wrote that my classic potato latke could hold its own against the frou-frou trimmings of a latke with...say... caramelized leeks, hashed parsnips, and... oh, feta and sweet potatoes. I smirked a little. And then I looked at what I wrote. And then I got hungry. Challenge accepted!

These latke won't be mistaken for peasant food, but essentially they're not too far from the model. Sweet potatoes are grated with an equal amount of parsnips, which provide an earthy edge to balance out the sugars. Instead of yellow onions you have sauteed leeks, and briny, creamy feta to provide savory accents. Usually I'm a purist when it comes to potato pancakes, but these fancypants latkes have won me over. I guess the joke's on me.

You can find the recipe over at the most excellent Food52 website (and thanks to Food52's contest for the inspiration to turn that idle threat a reality). Enjoy!

Tuesday, November 16, 2010

Carrot Fennel Parsnip Soup


I don't always travel well. I try to be game for life's adventures and experiences, but more often than not find myself overcome for a powerful longing for the pleasures of home -- namely my dog and my contoured neck-supporting pillow. And fresh vegetables.

I just returned from a lovely road trip of the Southwest with my dear friend Katie and her 5-year-old son. Between hiking the true-to-its-name Grand Canyon, checking out centuries-old cliff dwellings, meeting up with old and new friends, comparing hotel fitness rooms and singing lustily along with the Glee soundtrack (whilst dodging tumbleweeds on the abandoned highways of the Texas panhandle), I barely had time to miss anything. Except vegetables.

With the exception of the chili pepper, vegetables don't seem to feature too prominently in that part of the country. A squirt of lime into my nightly cocktail ensured I wouldn't get scurvy, but some lower-on-the-food-chain options would have been nice. I was ecstatic to see a wealth of sides listed at this gem of a roadside restaurant we encountered on our last night, but discovered that pork was a fairly liberally-used condiment, and my vegetarianism ruled out the turnip greens, cabbage, green beans, and even the potatoes. Ah well. I enjoyed my catfish, and resolved to cook some veg-heavy dishes upon my return. Like this soup.

This creamy carrot-fennel-parsnip soup tastes rich and satisfying, but is really nothing more than a whole mess of vegetables cooked down and blitzed into a delicious puree. The carrots, fennel and parsnips are all both earthy and sweet, given a slight edge with a glug of white wine. It has an elegant sophistication for any dinner party, but is easy to throw together any night of the week. The loss of vegetables was a small price to pay for all that I saw the past week. But still, it's good to have them back.


Carrot Fennel Parsnip Soup

yields 1 large pot
inspired by Amanda Hesser, but rendered nearly unrecognizable through my incorrigible tweaking

2 Tbsp butter or olive oil
1 leek, cleaned and sliced in thick rings
1 bulb fennel, cut in thick slices (use it up to where the stems get fibrous)
1 large or 2 small parsnips, peeled and cut in thick slices
1 1/2 lbs carrots, cut in thick slices
1 clove garlic, thinly sliced
1/2 cup white wine
~6 cups vegetable broth
salt and white pepper to taste

Melt the butter (or heat the oil) in a pot over a medium high flame. Add all of the vegetables, and stir occasionally for several minutes until they begin to lightly caramelize on the outside. Add the white wine, and allow to boil off for a minute. Add enough broth to cover by an inch or two, raise the heat until it comes to a boil, and then reduce the heat until it's just high enough to maintain a simmer. Cover and simmer until everything is very tender, ~half an hour. Puree in batches in a food processor or blender (I like a nice smooth puree, but feel free to leave it chunky if you prefer). Return to a pot, add additional broth as needed to get a nice soup consistency, and adjust seasonings to taste.

Monday, November 08, 2010

Huevos Rancheros (My Way)


I flirted with giving this recipe another name, since calling it huevos rancheros will cause me to lose serious cred with a certain demographic. So by way of disclaimer, I'm aware it's likely nothing resembling this dish has ever gone by this name in Mexico. Or New Mexico. Or Texas. But man is it good.

This particular creation was born after a glut of leftover salsa, and is in the tradition of the breakfast all-star shakshouka, or the invitingly-named eggs in purgatory. Instead of following the usual huevos rancheros policy of frying up eggs and topping them with salsa, eggs are poached directly in the salsa. You just warm up an inch or so in a pan, crack in as many eggs as needed, and cover the pan until they're cooked to your runny-or-not liking. This move is brilliant for several reasons:

1. The eggs sop up the salsa, becoming infused with its spicy flavor
2. You can cook up a whole pan of eggs at the same time, making it ideal brunch-party fare

We fed six adults at a recent brunch, and it was ridiculously easy -- I prepped the fixings ahead of time, then just cracked the eggs into a large pot of salsa, covered them, and rejoined my guests for another cup of coffee until they were done. Breakfast burrito coma ensued. After your eggs are cooked, where you go next is up to you. I tend to toss them in a warmed corn tortilla with a slick of refried beans (the vegetarian version of these are my guilty pleasure), cilantro, guacamole, sour cream (or its house substitute, yogurt), and maybe some radishes or chopped red onions if I'm feeling fancy. Who needs authenticity when you could be having this for brunch?


Huevos Rancheros

serves 2, but take this as a rough template and adjust to your taste/crowd size

3/4 - 1 cup salsa, depending on your pan size (I'm especially fond of this, and buy ridiculous amounts when it goes on sale)
4 eggs
4 small corn tortillas
3/4 cup refried beans, warmed
1/2 cup guacamole, or 1/2 avocado, diced
2 radishes, thinly-sliced
1/3 cup crumbled Mexican white cheese (such as queso fresco), or creamy French- or Israeli-style feta
1/4 cup chopped fresh cilantro
additional hot sauce and lime wedges for serving

Pour the salsa in a pan large enough to accommodate 4 eggs, and warm over medium heat until it's just simmering. Crack the eggs into the pan, cover, and keep the heat just high enough to maintain a simmer. Cook until the eggs are done to your liking (I go for somewhere between runny and set, ~7 minutes). While the eggs are cooking, you can assemble your topping ingredients and warm the beans.

When the eggs are almost done, heat the tortillas directly over a burner to warm and soften them (a small amount of char is fine withe me as well). Ladle an egg into a warmed tortilla, top with whatever other ingredients you desire, and enjoy.

Monday, November 01, 2010

Compost Cookies


Halloween is something of a crapshoot here. Sometimes the kids flood to the door in clumps of nearly a dozen, and other years we're lucky if we get that many the whole night. This past Sunday the doorbell kept ringing, and my helper hellhound and I greeted scores of neighborhood kids.


We were quickly cleaned out of our peanut butter cups. and I frantically biked to the grocery store to restock. Sadly the quality salty-sweet peanut butter candy was gone, so I grabbed a couple of bags of the "fun" size chocolate bar samplers, and rushed home. To total radio silence. We had two more trick-or-treaters the entire night. And so, with a bag full of Mr. Goodbars and Krackle, I turned to compost cookies.

Like many of my fellow Pacific Northwesterners, I'm something of an obsessive composter. So of course these cookies appealed to me. They're from baker Christina Tosi of New York's Momofuku Milk Bar, and are reputed to be a perfect repository for anything you can find in your pantry: bits of cereal, candy bars, goldfish crackers, pretzels, and, if stories are to be believed, a dollop of coffee grounds (I did, however, draw the line at the salt-and-vinegar potato chips lingering on a back shelf). You could probably try this nifty trick with any cookie recipe, but Tosi's particular variation whips the bejesus out of the butter and sugar, moving beyond creaming to create a crispy-outside, chewy-inside ugly-yet-delicious cookie. The most unexpected ingredients (I went with tortilla chips, a Chex-like cereal, and the assorted chocolate bars) create a deep combination of flavors, with that prized salty-sweet edge. Clearing out the leftovers should always be so delicious.


Compost Cookies

from Christina Tosi, via various blogs
yields ~15 large cookies


1 cup unsalted butter, softened to room temperature
1 cup sugar
3/4 cup brown sugar
1 Tbsp corn syrup
1 tsp vanilla extract
2 eggs
1 3/4 cups flour
2 tsp baking powder
1 tsp baking soda
2 tsp coarse salt
1 1/2 cups salty snack food (chips, crackers, pretzels, cereal, etc)
1 1/2 cups sweet snack food (candy bars, butterscotch chips, chocolate-covered whatever, etc)

Place the butter, sugars and corn syrup in a mixer, and beat with a paddle attachment until pale and fluffy, about 2-3 minutes. Scrape down the sides, and add the vanilla and eggs. Beat on low to incorporate, then raise the speed to medium-high and beat for a full 10 minutes. It will become paler in color and larger in volume.

While the mixture is beating, sift together the flour, baking powder, baking soda and salt. Set aside. Chop or crush or crumble your snack foods into little bits, and set aside.

When the butter mixture has been beaten for a full ten minutes, add the flour mixture and beat for a few seconds until just combined. Add the snack foods, and stir until combined. Cover the mixture, and chill at least an hour (and up to a few days -- do not forgo the chilling, otherwise terrible meltage and nasty flat cookies will ensue). After chilling, scoop into 1/4 cup portions, place on a cookie sheet (or plate, if your fridge, like mine, doesn't have space for a full sheet sheet), and chill another 1/2 hour.

Preheat the oven to 400 degrees. Place the shaped cookies on a greased or lined cookie sheet, and bake until they've browned on the edges, and are just beginning to brown on the tops (this takes less time than you'd think -- only about 10 minutes for such large cookies). Let cool on the sheet for a few minutes, then move to a rack and cool completely.

Sunday, October 24, 2010

Salted Butter Break-Ups


There's something intimidating about actually meeting people whose work you admire. You spend so much time appreciating from afar, be it music or writing or cooking, and feel a kinship with the artist because their work resonates with you so deeply. You know you must have so many sensibilities in common, and when you meet, this shared bond will just somehow sing across the room. If you don't end up bff, you'll at least end up with a real heart-to-heart moment, perhaps an invitation for a drink.

But in reality, it seldom works that way. You finally push forward your book for an autograph, stammer something generic about how "I really like what you do," blush, and melt back into the crowd. Sigh. Occasionally there are moments, such as when you and your friends sneak into the after party for a live taping of your favorite radio show and are invited out for a surreal evening of drinks afterward. But for the most part, it's pretty nervous-making and seldom goes the way you rehearsed in your many, many daydreams. Which is all to say I didn't go see Dorie Greenspan when she was in town this week.

For those unfamiliar with her lovely work, Dorie Greenspan writes about baking and French food. She manages to keep an eye on both the smallest details of technique, and the almost incalculably large role of food in our lives. Greenspan is also the woman behind the delicious salted chocolate sablees which I de-glutinized for a recipe earlier this year. And although I chickened out of the live meeting, I continue to worship in my oven from afar. And so I present Dorie's salted butter break-ups.

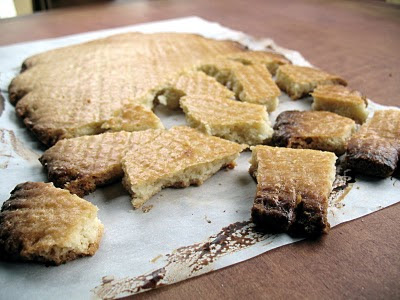
These cookies are baked from a single slab of buttery dough, and then broken apart into chunks with your hands (which proves just as emotionally satisfying as it sounds, plus yields a variety of textures ranging from nicely tender center chunks to deliciously caramelized end bits). I usually pooh-pooh people who say they don't have time to make cookies, because c'mon, they're so easy. But as I struggled to finish six quarts of soup and a round of bagel chips for a soup swap, a no-scoop mega-cookie sounded appealing. So I blitzed the dough, rolled it out, painted it with an egg wash and drew a crosshatch of lines with a fork (optional but fun, and strangely reminiscent of high school doodling for some reason), and baked it up. And broke it up. Perhaps next time I'll manage to make it to the book signing as well.


Salted Butter Break-Ups


yields 1 5"x11" cookie, which can be broken into as many chunks as you desire

adapted from
Around My French Table by Dorie Greenspan


1 3/4 cups flour
2/3 cup sugar
1 tsp coarse salt, plus more for sprinkling if desired
9 Tbsp cold unsalted butter, cut into 18 pieces
3-5 Tbsp cold water
1 egg yolk, plus additional water

Put the flour, sugar and salt in a food processor, and pulse for a few seconds to combine. Add the butter, and pulse until you're left with pea-sized bits (in addition to some small flakes). Pulse the machine and add the water gradually, until it just barely forms a ball (this might not require the whole amount). The dough will be very soft.

Scrape the dough onto a piece of plastic wrap, form it into a chubby square, and refrigerate for at least an hour (or a few days, if needed).

When the dough has chilled, preheat the oven to 350 degrees. Line a cookie sheet with a silpat or parchment, or grease well. Let the dough soften at room temperature for a few minutes. Roll out (between plastic or waxed paper) into a rectangle that's about 5"x11", and transfer to the prepared sheet.

Beat the yolk with a splash of water, and paint it over the surface of the dough with a pastry brush (or, if you're me, a wadded up bit of the waxed paper you used to roll out the dough). Using the back of a fork, decorate the cookie in a crosshatch pattern by drawing the underside across in one direction, forming a series of tracks, then perpendicular to them. Sprinkle with additional salt, if you favor a pronounced salty-sweet flavor.

Bake the cookie for 30 to 40 minutes, or until it is lightly golden (and slightly dark on the edges, if that's what you favor). It will be firm to the touch, but have a little spring when pressed in the center. Allow to cool to room temperature, then break it as you please, either before serving or at the table.

Monday, October 18, 2010

Soup Swap


I told you last week that I would leak a few more secrets about the soup swap that led to my (oh-so-delicious) bagel chips. So I present my article from today's Oregonian about a swap I attended in Portland, as well a general rundown of this sort of swapping. And as a bonus, you get a link to my very own matzoh ball recipe (as well as some other delicious homemade soups from friends and neighbors), and tips for hosting a swap of your own. What are you waiting for?

Tuesday, October 12, 2010

Bagel Chips


I love when multiple problems can be solved with a single act. To wit: a few weeks ago I attended a soup swap (more on that later), and needed to clear out some freezer space in anticipation of the quarts I was set to receive. It was a tall order, since my freezer is stocked to the gills with who-knows-what (my freezer inventory system is sadly no longer in effect). A significant chunk of freezer real estate was taken up by a bag containing a half dozen or so day-old bagels. And, concurrently, I needed to bring a snack to said soup swap. Hello, bagel chips!

Bagel chips are ridiculously easy to make. The hardest part is thinly slicing the bagels -- next time frozen bagels call out for en-chipping, I'll probably try to slice them up when they're still a bit frozen, so they'll hold together firmly for easy cutting. But beyond the slicing, it's just tossing with some oil, seasoning if desired (I used everything bagels, so I just added a sprinkling of salt, but you can add pressed garlic, chopped rosemary, or whatever sounds delicious), and baking. As an inveterate toast-burner, I erred on the side of well-browned crispness, but you can pull them from the oven whenever they're done to your liking. It's my new favorite way to clean out the freezer.

Bagel Chips

This is more of a loose guideline than an actual recipe, easily adapted to any amount of leftover bagels you may have in your possession (frozen or otherwise).


bagels, sliced as thinly as possible
olive oil
seasonings (salt, chopped or pressed garlic, fresh rosemary, etc.)

Preheat the oven to 350 degrees.

Place the bagels in a bowl, and barely coat them with olive oil (If you have one of those olive oil misters or a pastry brush, those work perfectly, but if you're like me, just drizzle with a bit of oil, place another large bowl over the top, shake madly, and repeat as necessary until they're all lightly coated). Toss with any desired seasonings, and turn out onto a cookie sheet(s) in a single layer. Bake, turning once or twice, until they're cooked to your desired level of browning, ~15-25 minutes. They will crisp up further upon cooling.

Monday, October 04, 2010

Moroccan Carrot and Chard Salad


It's hard to know what to cook these days. We're not yet into the brown-leafed, squash-studded days of fall here in Portland, but at the same time it's not really summer either. We've been alternating between barbecue-ready sunny afternoons, and rainy cold days that make you wonder if it's not too soon to dig out your wool sweaters. Hot soup? Cold salad? Hard to say.

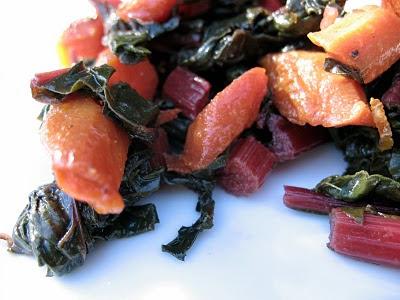
This carrot and chard dish is one of my favorite recipes for these liminal days. It's a warm salad from the Moroccan tradition, pairing cooked carrots and chard with a bright herbal dressing. The recipe comes from Wolfgang Puck's contribution to The New York Times Passover Cookbook, and it's graced our Passover table for the past two years. The seder meal is often a celebration of Spring, and sprightly spears of asparagus are a common choice. But it's also right on the seasonal cusp, and depending upon the particulars of the Jewish calendar and the weather patterns, Passover can happen weeks before the chilly fields are even thinking about asparagus. This dish is a perfect choice for times like these, and not just because the shoulder crops of roots and greens are in season: the earthy/sweet carrots and rich chard provide a hearty, autumnal base, but the bright lemon juice and parsley perk things up with bright and sunny notes. On these strange days, when you wrap a thick cardigan around your sleeveless shirt, it's the perfect recipe.


Moroccan Carrot and Chard Salad

adapted, heavily, from Wolfgang Puck's recipe in The New York Times Passover Cookbook (I roasted instead of simmered the carrots, upped the parsley, reduced the oil, and made a few other tweaks)

serves 4-6 as a side dish

2 lb carrots, peeled and cut on the diagonal into 1" chunks (or longer if you like a more dramatic presentation)
1/4 cup olive oil, divided
1 tsp ground cumin
1 large bunch (or two small bunches) Swiss chard, coarsely chopped (stems included)
1 clove garlic, pressed
zest and juice of 1 lemon
salt and pepper
1/2 large bunch (or 1 small bunch) flat-leaf parsley, chopped

Preheat the oven to 400 degrees.

Toss the carrots in a baking dish with 1 Tbsp of the olive oil, and sprinkle on the cumin and a few pinches of salt. Stir to coat the carrots with the oil and seasonings. Roast, stirring occasionally, until the carrots are soft and caramelizing on the edges, about 25-30 minutes (adjust the time depending upon how well-caramelized you like your carrots). Remove from the oven and set aside.

While the carrots are roasting, steam the chard in a steamer basket until wilted and soft, about 5-10 minutes. If you don't have a steamer basket, you can just simmer the chard for a few minutes in a large pot of boiling water, then drain well. Set aside.

In the meanwhile, make the dressing: mix together the remaining olive oil, garlic, and lemon juice and zest, and season with salt and pepper to taste. Place the carrots on a serving dish, top with the chard and parsley, and then pour the dressing over everything. You can toss to combine, or leave as is, like a composed salad. Serve warm. It's even nicer as the flavors sit and combine, but I seldom wait that long.

Tuesday, September 28, 2010

Borek with Greens and Feta


Several years ago I formed a lunch collective with a group of co-workers. We took turns bringing in food for each other, sharing the cooking load and saving each other from the truly dismal take-out options surrounding our office. In addition to saving time and money, the club exposed me to a whole library of other people's recipes. But amidst the culinary excitement, some trends started to emerge. There are some ingredients that seem ubiquitous across the continents, and seem to travel in pairs. For one: chickpeas and tomatoes. This classic combination cropped up in Indian, Italian, and general hippie recipes across the board. I think I ate 4-5 variations on the theme. And another combination, one dear to my heart: the savory greens pie.

Even on this blog which only recently passed its first birthday, I've already posted a few passes at this classic package. There's my favorite spanakopita recipe, a Greek-inspired pairing of spinach with creamy feta, cottage cheese, and fresh dill. And this Middle Eastern take, with individual spinach turnovers studded with pine nuts and lemony sumac. And evidently I can't stop, because now I'm going to tell you about the Turkish version: borek.

Borek is a catchall term that could describe a great range of savory pastries, from a phyllo-covered meat turnover to a little cigar-shaped package of cheese rolled in yufka dough. In this case, it's a light yeasted dough layered with greens, herbs and feta cheese. It's lovely, and much easier than the dramatic presentation suggests. The original recipe calls for spinach, but I cooked down some Russian kale instead, and mixed it with a bunch of flat leaf parsley (inspired by the similarly sesame-studded Izmir flatbread in my favorite Paula Wolfert cookbook). It's substantial without being heavy, and since you don't have to worry about flaky phyllo, it's a perfect travel food. There are reasons some things become classics.


Borek with Greens and Feta

adapted from Home Cooking in Montana, who translated it from the Romanian on Gabriela's Blog
yields 1 8" square borek


Dough
1/2 cup warm milk
1/4 cup plus 1 Tbsp warm water
1 3/4 tsp active yeast
2 cups flour (you can swap out half whole wheat flour--just add an additional Tbsp water)
3/4 tsp salt

Filling
1 Tbsp olive oil
1 bunch Russian or lacinato kale, washed and finely chopped
salt
1 small bunch flat-leaf parsley, washed and finely chopped
3/4 cup feta

To finish:
2-3 Tbsp melted butter or olive oil
1 egg, beaten
1 Tbsp sesame seeds

To make the dough: Pour the water and milk in a mixing bowl, sprinkle on the yeast, and allow to soften for a few minutes. Add the flour and salt, kneading with your hands or a dough hook for several minutes until you create a soft, pliable dough that just clears the sides of the bowl (if it doesn't, add a touch more flour). Cover and let sit for a few minutes while you prepare the filling.

To make the filling: Heat the oil over medium heat in a large pot. Add the kale and stir to coat with the oil, and sprinkle with a very light dusting of salt to draw water out. Cover and cook, stirring occasionally, until the kale is softened. Add the parsley, and cook an additional minute. Remove from heat and stir in the crumbled feta.

To assemble and bake: Divide the dough into 3 equal pieces. Roll out the first piece to form a large rectangle, ~15"x17". Drizzle it with the melted butter or olive oil, and then scatter half the filling evenly over the top. Roll out the second piece of dough, lay it on top of the first, and repeat the process with melted butter and the remaining filling. Roll out the final piece of dough, lay it over the top, and drizzle with the remaining butter.

Fold the right- and left-hand sides in, so that they meet in the middle (you can consult the pictorial on this page, which gives you a better idea of the whole process). Repeat with the top and bottom, so you have a nicely folded package. Flip it upside-down, so the smooth underside is on top. Roll it gently with a rolling pin, taking care to not tear the dough while you ease it into a roughly 8" square. If you have parchment paper, place the borek on a large square of it. With a large knife, cut through all the layers halfway through each side and on the diagonal, yielding 8 little triangles. Pick up the parchment, and transfer the cut square into an 8" brownie pan (if you don't have parchment, just make sure your pan is well-greased). Cover lightly with a clean dishtowel, and let rise for about 1 hour.

When the dough is almost done rising, preheat your oven to 375 degrees. Gently brush the dough with the beaten egg, and sprinkle with sesame seeds. Place in the oven and bake until lightly browned, ~30-45 minutes. Let cool and serve.

Monday, September 20, 2010

Granola Bars


There seem to be certain truisms of parenting an infant. Baby boys will pee on you about once a week. Finding the time to shower is shockingly difficult. And new nursing mothers crave nothing more than calorie-dense, healthy snacks that can be eaten with one hand.

I spent last weekend with my dear friend in Minneapolis, checking in on her and her adorable cooing baby boy. In addition to catching up, taking walks, and general infant detail, we cooked a staggering amount of food. Potato knishes (and their exciting cousins, broccoli cheddar potato knishes), red lentil soup, borscht, kreplach, chard and carrot salad, lentil walnut burgers, enchilada sauce, sloppy sauce, oatmeal raisin cookies, and some other things I’m probably forgetting. I’m surprised we were able to close the freezer. I can report that, based upon this small nonscientific sampling, any of the above would be happily received by a new mother. But these homemade granola bars might be our most exciting creation.

The majority of commercially-made granola bars are tooth-achingly sweet, more like a oaty alternative to a doughnut than an actual health food. Luckily Smitten Kitchen took on this quest for a delicious granola bar, and adapted a recipe from the venerable King Arthur Flour blog (the folks behind my favorite peanut butter chocolate cookies). I took this adaptation and tweaked it even further, cutting the sugar down yet again, swapping out honey for the corn syrup (or, as I believe it would like to be known, corn sugar), fussing with the spices, and replacing the butter with the oh-so-delicious coconut oil. This recipe is a lovely loose template, giving you a framework into which you can sneak any nuts, seeds, dried fruit, or other nubby goodness your pantry and heart steer you towards (we went with a pantry-cleaning mix of almonds, walnuts, pecans, sesame seeds, flax meal, coconut, dried cranberries and raisins). The bars are like your favorite granola, all toasty and nutty, pressed into a convenient hand-held cube. Irresistible. I doubled the recipe and left behind a lasagna pan’s-worth of bars behind me, but I doubt they’ll last the week.


Granola Bars

adapted from King Arthur Flour, via Smitten Kitchen
yields 1 8" square tray

Make sure you let these bars fully chill in the refrigerator before cutting. If you’re impatient and jump the gun (because, say, you needed to clear out the casserole dish in order to fill it with spanikopita), your bars may crumble a bit (in a related note, the crumbles are ridiculously delicious with yogurt). Chilling the bars fully sets them firmly, allowing you to neatly chop them into single servings.


1 2/3 cups rolled oats (aka oatmeal)
1/3 cup oat flour (if your pantry doesn’t contain this, just blitz oatmeal until it’s reduced to a floury powder)
1/3 cup sugar
1/2 tsp salt
pinch cinnamon
pinch cardamom
pinch nutmeg
2-3 cups dried fruits, nuts, seeds or grains of your choosing (walnuts, almonds, cashews, pecans, sesame seeds, pumpkin seeds, raisins, prunes, dried apricots, currants, flax seeds, ground flax meal, etc etc etc)
6 Tbsp coconut oil (substitute butter if desired)
1/3 cup almond butter (or peanut butter)
4-6 Tbsp honey (depending on your sweet tooth and honey availability)
1 Tbsp water

Preheat your oven to 350 degrees.

If your nuts aren’t toasted, you can toast them in the oven while you’re assembling the other ingredients (this step may sound fussy, but the depth of flavor you get is totally worth it—just make sure you don’t forget and burn everything).

Mix together all of the dry ingredients (including sugar) in a large bowl, and set aside. Line an 8” square pan with parchment, if you have it, or just grease the pan well and hope for the best. Set aside.

Place the coconut oil in a saucepan, and warm over a low heat until it melts (this won’t take long). Add the almond butter, honey, and water, let sit for a moment to warm and loosen, and then mix until well combined. Pour this syrupy mixture over your dry ingredients, and stir until well combined. Pour the combined dough into your pan, and press it down firmly to compact it evenly. Place in the oven and bake ~30-45 minutes, until the edges and top are lightly browned (if you like your bars chewy take them out as soon as this browning happens, when the bars seem barely set; for crisper bars wait until they are well-browned). Let the pan of uncut bars cool to room temperature, then move them to the refrigerator until they are fully chilled (~45 minutes). Remove the bars from the pan, and cut them into shapes of your choosing. Store at room temperature in a covered container, or in the refrigerator if the weather’s hot and humid. They also freeze beautifully.

Tuesday, September 14, 2010

Kreplach Redux


It seems I've been somewhat remiss this Rosh Hashanah. Yes, I told you about a galette that played on the traditional flavors of the holiday, mixing crisp apples with rosemary-infused honey. But I somehow forgot to tell you about my kreplach. I wrote about kreplach here last year, when I first figured out how to make the lovely wonton-like packages on my own (thanks, egullet!). But last week I ran a story in our paper plumbing the history, significance and technique behind this delicious-yet-unfortunately-named dumping, and somehow I forgot to tell you all about it. Oops! I'm atoning for it now -- you can follow the link and read the details in The Oregonian.

Monday, September 06, 2010

Rosemary Honey Apple Galette


A few years ago, I read a great article attempting to parse the seemingly random trends in baby names. Sociologists weighed the evidence, and tried to figure out why there now seem to be a glut of Isabellas but nary a Lisa in sight. They pointed to numerous factors, but one that stuck out in my mind was the strong pull of the slight variation. Sometimes a name becomes so popular that it starts to feel a wee bit stale. But make the smallest of tweaks, and the name sounds fresh again. Exit Madeleine, enter Madison. My daily world is food (as opposed to baby names), but I know just what they mean. Sometimes I want the familiar flavors of tradition. But I'm also a little bit bored with that, and crave a variation that satisfies off my childhood memories while appealing to my grownup tastes. Exit the honey cake, enter the rosemary honey apple galette.

This week brings Rosh Hashanah, the Jewish new year celebration. Apples and honey are traditionally eaten on the holiday, to give a sweetly auspicious start to the coming year. Many of my sticky childhood memories involve a bowl of MacIntoshes and a bear-shaped plastic squeeze bottle. I wanted to make a dessert featuring that familiar combination, but providing a more sophisticated riff on the season.

This galette does the job beautifully. The apples are a tart, firm variety, instead of the mealy Macs of my youth, and are featured front-and-center in the open-faced tart. Honey is used to flavor a thin layer of frangipane, a base of almond custard that keeps things from drying out, and also drizzled on top after the galette comes out of the oven. But even better, the frangipane and finishing honey are both infused with the piney scent of rosemary. It's subtle, providing just a bit of sharpness to play against the sweet round notes of apples and honey. I daresay it could start a new tradition of its own.


Rosemary Honey Apple Galette


Frangipane:
2 Tbsp butter, softened to room temperature
3 Tbsp honey
1 Tbsp finely-chopped fresh rosemary
1/3 cup ground almonds
pinch salt
1/4 tsp vanilla
1 egg

To Finish:
1 unbaked pie crust
4-5 apples (~2 lbs), a tart variety like Granny Smith, peeled, halved and cored, and thinly sliced (I like to keep the slices together in the apple-half shape, and just fan them slightly onto the crust)
1 Tbsp butter, melted
1 Tbsp sugar
1/4 cup honey
1 sprig rosemary

Preheat the oven to 400 degrees.

Mix together the frangipane ingredients (this is a snap in a food processor, but you can easily mix it by hand if you take care to finely mince the rosemary). Set aside.

Roll out the crust to a few circle with a diameter a few inches larger than your tart pan. Ease it gently into the pan, and spread the frangipane evenly over the base (just the base, not the overhang). Lay the apples on top, fanning the slices slightly and arranging them in whatever design you like. Take the overhanging crust, and fold it gently inwards to cover the edges of the apple slices, arranging it into folds as needed. Brush the exposed apples and crust with the melted butter, and sprinkle both lightly with the sugar. Bake until the apples brown at the edges and the crust is becoming lightly burnished, ~45 minutes.

Shortly before the galette has finished baking, take the remaining scant 1/4 cup honey and place it in a saucepan with the rosemary. Heat it gently, so that the honey becomes runny and infuses with the rosemary flavor (don't let it come to too much of a boil, or it'll be reduced to an unpourable thickness). Fish the rosemary out with a fork, and drizzle the infused honey over the apples. Serve.

Tuesday, August 31, 2010

Roasted Cherry Tomato Tart


When I'm invited to a potluck, my culinary inclination goes in one of two directions. Sometimes I want to go all-out in my kitchen, due to either adoration for my fellow potluckers, a latent competitive desire to impress, or just excitement at having an excuse to try out extravagant recipes. And other times I feel the pinch of my budget, and a slight surly resentment at feeding strangers better than I feed myself, and the motivating principle is producing a respectable potluck contribution for about $5. Luckily, there are dishes like this roasted cherry tomato tart, which can satisfy both of these impulses. This tart is crazy elegant, and also ridiculously cheap (especially if you, like us, have tomatoes of all sorts spilling out of your front yard).

This tart takes lovely late-summer tomatoes, and concentrates their flavor with a roast in a slow oven (which also has the added benefit of reducing their moisture content, so your tart won't be soggy). You can skip the slow-roasting step, if you like, and your tomatoes will be a bit prettier and less shriveled, but not nearly so rich. The roasted tomatoes are set on a bed of goat cheese that has been lightened with a bit of egg and half-and-half -- the liquid isn't enough to create a quiche-like custard, but gives the goat cheese a bit of mousse-like softness. The tangy goat cheese perfectly complements the rich tomatoes, and a wee bit of mustard on the base and fresh thyme leaves over the top provide a nice accent without distracting from the summer flavors. It's sure to please any sorts of crowds.

And speaking of group meals (potluck and otherwise), I return to the subject of my all-zucchini dinner party. I know that some of you thought sure, it's nice to read about. But what did it sound like? Well, wonder no more. You can hear an audio dispatch over at The Splendid Table, and see a slide show full of zucchinitastic photos.


Roasted Cherry Tomato Tart

1 9" tart crust, par-baked
~ 1 1/2-2 cups cherry tomatoes (the exact amount may vary, depending upon the size and shape of your tomatoes - if you roast too many, that's not a bad thing at all)
olive oil
1 Tbsp dijon mustard
8 oz soft goat cheese, such as chevre
2 eggs
1/2 cup half-and-half or milk
2 tsp chopped fresh thyme (or other herb of your choice), divided
salt

Preheat the oven to 200 degrees. Halve the cherry tomatoes along their equators, and place them cut-side up in a baking dish. Drizzle with a bit of olive oil, and place them in the oven for 3 hours. They should shrink up somewhat, to maybe 2/3 their size, but still be juicy. Set aside.

Raise the oven temperature to 375 degrees. Spread the mustard along the bottom of the tart shell, leaving a very thin layer. In a mixer (or using a whisk or fork and a lot of patience), blend together the goat cheese, eggs, half-and-half, and half the fresh herbs. Pour this mixture into the tart shell. Gently place the tomatoes on top, cut-side up, in an arrangement that strikes you.

Gently transfer the tart to the oven, and bake ~45 minutes, until the filling has puffed and begun to brown, and the tomatoes are caramelized a touch on top. Remove from the oven and let cool slightly. Sprinkle the remaining fresh herb and a light sprinkling of salt across the top, and serve.

Tuesday, August 24, 2010

Frozen Watermelon Daiquiri


While there are many times I use my freezer for the purpose that God and Whirlpool intended, more often than not it serves as sort of way station en route to the trash. Sure, I've got a useful bag of trimmings for vegetable stock, piles of frozen garlic naan for impromptu Indian, and tubs of homegrown tomatoes. But then there's the dark side. Cooking experiments that are too terrible to stomach (but too nutritious to compost) get apportioned into neat serving sizes, tucked into the freezer, and left there. For a good long time. Sometimes the better part of a year. Oof. I end up with a somewhat fraught relationship with my over-full freezer. But that relationship has been wholly repaired by the frozen watermelon daiquiri.

The other day we split a watermelon between three people. Not one of these teensy personal-sized melonlets that are apparently all the rage, but a full-on, armload of melon. It was huge. Even on a hot day, we only put a dent in it. What remained was literally too large to fit in the refrigerator. So I hacked it into cubes, filling one container after another, until we filled the refrigerator. In desperation, I tossed the remaining tub of watermelon cubes in the freezer. Maybe I'd get to them someday? Or maybe they'd just end up in the compost a few months later, like my other frozen good intentions. But then the heat rolled back around, an internet search revealed a slushy, boozy cocktail, and oh man am I now the biggest fan of frozen watermelon.

This cocktail is quite simple, especially if you've got a tub of frozen watermelon in your freezer. If not, just cube some up, toss it in, and wait a few hours. The sweet icy cubes are blended up with rum, lime juice, a splash of soda if you've got it, and a sprig of mint. The combination of frozen watermelon and cooling mint makes this one of the most refreshing cocktails I've ever slurped.


Frozen Watermelon Daiquiri


adapted, heavily, from Cooking Light
yields 1 drink, but can easily be multiplied by number of drinker
s

1 cup cubed and frozen watermelon
juice of 1/2 small lime
1 tsp sugar
1 sprig mint
1 shot light rum
splash seltzer (~2-3 Tablespoons)

Place all ingredients in a blender, and pulse until well-mixed into a slushy, frothy mix. Pour into a glass and enjoy.

Tuesday, August 17, 2010

Perfect Peanut Butter Chocolate Chip Cookies


My dog has a basket of toys by the front door. There are a few that he plays with nearly every day -- bones to gnaw and hollow rubber thingies to fill with peanut butter -- but then there are a handful that he ignores. Some promotional stuffed animal that he stopped caring about once he realized it couldn't be destroyed, or the twisted rope he liked to play tug-of-war with five years ago. He'll toss them aside to reach the more exciting items underneath, but for the most part they sit around gathering dust. Until another dog comes to the house. Magically, the value-adding property of another dog's interest renders a treat infinitely more appealing. You want that thing I've ignored for five years? Suddenly I want it too! So much!

I laugh a bit at this transparent ridiculousness, but truth be told I can be the same way. My friend Robert once noted that somebody could be eating poop on a cracker, and he'd be angling for a bite. It can happen easily. A few weeks ago, I took the cookbook Baked: New Frontiers in Baking out of the library. I thumbed through the pages, earmarking a few, thinking maybe I'd make them someday. But then I saw an enticing version of Baked's peanut butter chocolate chip cookies on the lovely blog A Little Ginger. And suddenly I wanted them too! So much!

I've eaten my share of peanut butter cookies over the years, but these are easily the best I've had. Hands down. Perfect cookies. They have a toothsome texture somewhere between soft and crisp, with a deep, slightly salty peanut butter flavor. They keep well, like any cookie, but I think they're especially lovely the first day.

And speaking of ridiculous notions that consume your thoughts, I recently was so taken with the zucchini dishes I saw posted everywhere that I decided to host an All Zucchini Dinner Party. It took a bit of recipe-testing, a mountain of zucchini, and some very game friends, but in the end a good green meal was had by all. You can read about it (and get more recipes than you can shake a squash at) in The Oregonian.


Perfect Peanut Butter Chocolate Chip Cookies

adapted from Baked: New Frontiers in Baking
yields ~36 cookies


1 3/4 cups flour
2 tsp baking soda
1 tsp salt
1 cup (2 sticks) unsalted butter, softened to room temperature
1 cup granulated sugar, plus more for topping
1 cup packed brown sugar
2 eggs
1 tsp vanilla
1 cup peanut butter
6 oz chocolate, milk or dark, coarsely chopped

In a medium bowl, sift together the flour, soda and salt. Set aside.

In a mixer, cream together the butter and sugars until light and fluffy. Add the eggs one by one, mixing until combined. Add the vanilla and peanut butter, mixing until well combined.

Fold in the dry ingredients until *just* combined. Fold in the chocolate bits, and place in a covered container and refrigerate overnight.

On baking day, remove the dough from the refrigerator, and preheat the oven to 375 degrees. Plop out rounded tablespoons of dough onto lined cookie sheets, at least 2" apart, and flatten slightly with the heel of your hand to smush the doughballs into chubby disks. Sprinkle a bit of granulated sugar on each cookie, enough to give a light dusting (this will make a lovely, sweet-crunchy crust).

Place sheets in oven and bake 10-12 minutes, until the edges just turn golden brown. Remove from oven, let cool on the sheet for 5 minutes, and then remove to finish cooling on a rack. Enjoy.