Monday, August 08, 2011

Celery Julep


When you're a kid, it's hard to parse out what in life is universal, and what's particular to your specific situation (be it family, region or country). Growing up in suburban New York, I had no idea that Rosh Hashanah, the Jewish New Year, wasn't a national school holiday. Or that getting bussed in to a theater to see productions of weird Swiss pantomime wasn't an annual rite of childhood. Or that some people had never even heard of Cel-Ray soda.

For the uninitiated, Cel-Ray is a celery-flavored soda. And it's much better than it sounds. It's got celery's snappy vegetal notes, but tamed into a sweet fizzy drink. Cel-Ray's traditional lot in life is to serve as a perfect foil to a fatty deli sandwich, where its bite cuts through like ginger ale. And like ginger ale, it's great in a whiskey drink.

This recipe, from the Lee Brothers, differs from Cel-Ray in some substantial ways (namely that it's much more delicate and fresh-tasting, and missing the high-fructose corn syrup). But it creates a deliciously balanced cocktail. Celery stalks are blitzed and strained, along with some celery seeds, and the resulting bright-green juice is just barely heated with a scoop of sugar to create a syrup. This leaves the celery still tasting bright and clean, so it can stand up perfectly to a bit of whiskey (they favor Bourbon, but I think it's great with whatever you've got). Lifted with lemon and lightened with seltzer, it turns into a great summer cocktail. The only downside is that you've got to drink it quick -- the celery syrup tastes snappy when fresh, but slightly bitter after a day or two. Fortunately, this is not hard.


Celery Julep

adapted, very slightly, from The Lee Bros. Simple Fresh Southern: Knockout Dishes with Down-Home Flavor
yields enough concentrate for ~5-6 drinks


4-5 large stalks celery, roughly chopped (plus additional whole stalks for garnish)
1/2 cup plus 1 Tbsp sugar
1/2 tsp celery seeds
hefty pinch salt
whiskey
lemon juice
seltzer

Put the celery, 1 Tbsp of the sugar, celery seed and salt in a food processor. Pulse until the mixture is reduced to a puree. Pass it through a fine-mesh strainer, pressing on and discarding the solids.

Place the strained celery juice in a saucepan, along with the 1/2 cup sugar. Heat gently until it just dissolves, then cool.

To assemble the juleps, shake together 2 ounces whiskey, 1 Tbsp lemon juice, and 2 Tbsp celery syrup with ice. Pour into a glass with ice, top off with seltzer, and garnish with a celery sprig. Adjust to taste.

Monday, August 01, 2011

Fudge Popsicles


People always talk about the transformative power of smell, how it can wordlessly tug at your memory and transport you back in time. But I think this power isn't limited to scents, the smoke that wafts from fall leaf piles or summer barbecues. It can come from something you see, or a song, or the words that someone says. You're moving through time in the usual one-foot-after-another fashion, forgetting how different things used to be. And then you hear a voice just like your grandmother's, or walk up a staircase just like in your childhood home, and all of a sudden time collapses. Or not collapses, really. It's more like you step outside of it for a moment, seeing how things move and change, hugely, and how you'll only see this sliver of it (and even that slips away from you all the time), and how it's terribly sweet and terribly sad but somehow okay in the end.

It doesn't hurt that I ate this fudge popsicle on a warm summer evening, the kind that are made for stretching time. But still. It's exactly like childhood, like those pops your mom got you that you haven't slurped in a couple decades. It's really a bit of a frozen pudding, which you lick and slurp and chew off little bits of when you can't hold back any longer, and you alternate between remembering, feeling what it's like to be a kid, and just wholeheartedly appreciating how delicious it tastes. Whether you're looking for a rich-yet-light chocolate dessert, or a time machine, or just a way to cool off in summer, I can't recommend this enough.


Fudge Popsicles

adapted from Matt Armendariz's On A Stick, via Smitten Kitchen
yields 4 standard (3 ounce) popsicles


2 Tbsp semisweet chocolate chips (or chopped semisweet chocolate)
1/3 cup sugar
1 Tbsp cornstarch
1 1/2 Tbsp cocoa powder
pinch salt
1 1/4 cups milk
1/2 tsp vanilla
1/2 Tbsp butter (I omitted this, and all was still well)

Place the chocolate in a saucepan, and heat over a very low flame until just melted (to avoid scorching, it's easiest to just turn on the burner for a minute, then turn it off and let things sit while you gather other ingredients, by which time they should be softened). Stir in the sugar, cornstarch, cocoa powder, salt and milk, whisking until smooth. Raise the heat to medium, and cook, stirring, until the mixture thickens (~5 minutes). Remove from heat, and add the vanilla and butter. Set aside to cool slightly (if you have plastic molds, you'll want to be sure the mixture doesn't have much heat at all left).

Pour the mixture into popsicle molds. If you have the kind with stick handles attached, simply freeze until solid. Otherwise let freeze half an hour, insert popsicle sticks into the semi-frozen mixture, and freeze completely.

Monday, July 25, 2011

Summer Stir Fry


A few years back I was discussing the television show The Wire with a friend, talking about its gritty depiction of drugs, police and poverty in Baltimore. My friend observed that it was this amazing, compelling window into a world that she just never, ever, ever wanted to visit. To a limited extent, I feel that way when I read certain blogs.

Like many blog readers, I have a mild obsession with The Pioneer Woman. I linger dreamily over her descriptions of life on a ranch, of storybook romance, of the grown-up fantasy of Little House on the Prairie meets a Viking range and high speed internet (and without the smallpox and scarlet fever). But the recipes? I generally am not going to go there.

As a produce-loving vegetarian (well, fishatarian), it's understandable that I wouldn't find too much to drool over coming out of a cattle ranch kitchen. Sure, I share the love of butter. But not as a fundamental food group building block. And while there are the occasional forays into what she jokingly calls "cowgirl food," the bulk of the entries are steak, chicken, steak again, etc. So generally after reading and loving the witty introductions and descriptions of daily Oklahoma life, I tend to skip the actual recipes. Until I saw this summer stir fry.

This recipe is great. It's just a whole pile of sweet corn and zucchini, studded with briny-sweet shrimp. I've tweaked it a bit to suit my taste and incorporate elements of other recipes I've loved, adding a hit of lime juice, a sprinkling of summer basil, and buttery chunks of avocado. The result is somewhere between a stir-fry and a salad, all light and summer and vegetable, but surprisingly satisfying. I could eat this three days a week.

And in other news of surprising culinary cultural exchanges, here's a recent radio story I produced about the past and present of food cart fusion cuisine. Perhaps Korean tacos will be next on the menu.


Summer Stir Fry

inspired by The Pioneer Woman
serves ~3-4


1-2 Tbsp butter or olive oil
2 cloves garlic, thinly sliced
3/4 lb shrimp
2 zucchinis, thinly sliced
3 ears of corn, kernels sliced off (if you have a bundt pan, jamming the ear into the center ring and slicing so that kernels fall into the pan works brilliantly)
juice of 1/2 lime
1 handful basil, thinly sliced
salt and pepper to taste
1/2 avocado, cubed

Heat a large skillet over a medium-high flame. Add 1 tablespoon of the butter or oil, and then the garlic and saute until just beginning to turn golden. Add the shrimp, and cook, stirring occasionally, until the shrimp are just barely cooked through. Pour the shrimp and garlic out into a large bowl, and set aside.

Add the zucchini to the pan, with additional butter or oil if needed. Sautee until softened and beginning to color. Remove from the pan (you can just add it to the same bowl as the shrimp and garlic).

Add the corn to the skillet, and cook just a minute or two until it turns a darker color but is still crisp. Turn off the flame, and add the corn to the shrimp and zucchini. Season the mixture with the lime juice, basil, and salt and pepper. Mix well, and adjust seasonings as needed. Add the cubed avocado, and stir gently to mix. This is great warm from the skillet, or cold from the fridge.

Tuesday, July 19, 2011

Syrniki (Russian Cottage Cheese Pancakes)


Like most cooks, I tend to taste my way through a recipe. I pop cubes of raw vegetables in my mouth after I dice them, and grab a couple bites along the way to gauge whether they're cooked through. And then how can you season to taste if you don't taste? By the time the meal is served, I've already eaten my first course.

But with syrniki, I have taken the snack-and-simmer approach to new heights (or depths?). These Russian cottage cheese pancakes are just so amazingly delicious that I could not stop eating them directly from the pan. They're moist from the dairy (farmer cheese or cottage cheese, if you don't have access to the Russian dry curd cheese tvorog), fresh-tasting and barely sweet. And the pan-frying in melted butter probably doesn't hurt. Often they're studded with raisins, but in the summer they're lovely with cold sour cream and some sweet berries or compote (though I ate a good third out of hand, before they even hit the plate, and that might have been the best of all).

Unlike heavier American flapjacks, these light syrniki make for a sweet dessert. But they're equally good as a small meal in and of themselves, especially on summer days where you don't want to turn on the oven. Provided you have better self-control than I do, and can manage to actually save some for your dinner guests. You can find the details, along with stories and recipes for several other Russian dishes, over at NPR's Kitchen Window.

Sunday, July 10, 2011

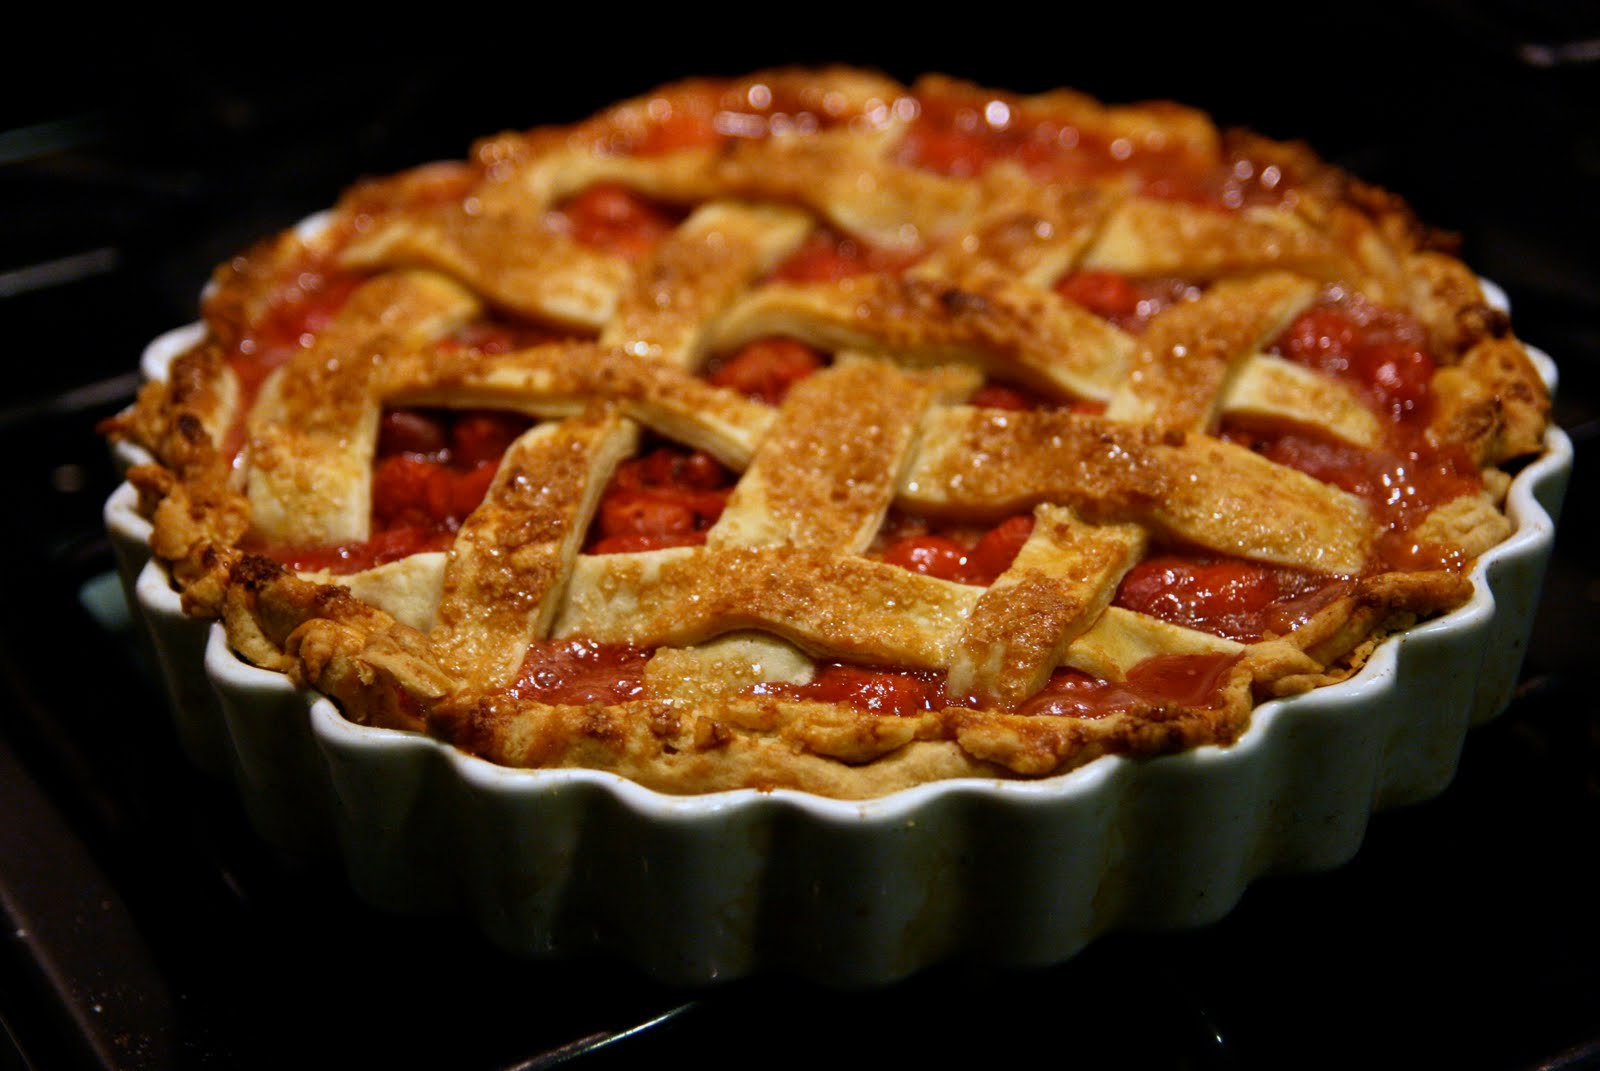
Sour Cherry Tart


When I see a fruit pie, even a home-made one, I must shamefully admit that my first reaction isn't generally excitement or anticipation. It's a small twinge of disappointment -- Why did you do that to perfectly good fruit? I feel like the old woman, looking at her granddaughter's new eyebrow ring, who wistfully tells her that you had such a pretty face. I know, I'm so much fun, right? But summer fruit, especially here in the Pacific Northwest, is so lovely. And most pies just don't do it justice.

Pies faults are usually small, but they do add up. Crusts are tough, cardboardy, a vehicle that's often pushed aside (especially after a stint in the refrigerator). Fillings are over-set into a sludgy gel, where the starch overwhelms the fruit. And the fruit itself can be over- or under-cooked, with dull, un-summery flavors. It's no wonder that I used the think I didn't like pie.

But as it turns out, I do like pie. I like it a whole lot. It just has to be made well. Which, thankfully, isn't all that hard. Make your own crust, and make it with butter and a light hand (or, instead go with a nice pre-made all-butter puff pastry). Give your fruit just a little bit of sweetness and thickener, and let the flavor shine through. The fruit isn't the same as fresh -- cooked fruit is sort of a different animal -- but if done well, it can be something better.


Yesterday I picked a whole mess of sour cherries from a neighbor's tree (with a good amount of help), in exchange for a jar of the jam I was making. We ended up with 5 lbs or so, which would make a whole lot of preserves. So I jammed up half of them, and reserved the other half for this tart. I mixed up a batch of my favorite fail-safe crust recipe (swapping in a little whole wheat flour, as is my wont), and layered it with just a bit of ground almonds and sugar to add a subtle nutty, goo-absorbing layer to the bottom. Then I tossed the cherries with nothing more than sugar and tapioca starch (my favorite pie thickener) and a few dots of butter to keep things lovely, then topped the whole affair with a bit of lattice and an overly-generous sanding of coarse sugar. The result is amazing. The cherries aren't so much sour as just flavorful, more punchy than puckery. They soften in the oven, their juices mixing with the starch to become a syrupy filling. The crust isn't an afterthought at all, but a flaky, delicate pastry that complements the soft fruit, with the coarse sugar as a delightfully crunchy counterpoint. I realize that my description is a bit over-the-top and swoony, but really, it's totally warranted. This is pie as it's meant to be.


Sour Cherry Tart

filling adapted from several sources, including The New York Times, though I recommend this crust instead

1 double crust, unbaked (I made a 3/4 batch of this excellent recipe, then used 2/3 for the bottom crust and 1/3 for the lattice, which worked perfectly for a loose lattice)
1/2 +2 Tbsp sugar, divided
1/4 cup ground almonds
2 lbs pitted sour cherries (~5 cups)
3 Tbsp tapioca starch
1 Tbsp butter, cut into bits
1 egg, beaten with a bit of water or cream
coarse sugar for sprinkling

Preheat your oven to 400 degrees. Mix together the 2 Tbsp of sugar with the ground almonds, and set aside. Toss together the cherries. remaining 1/2 cup sugar, and tapioca starch, and set aside.

Roll out the bottom crust and place it in the tart pan, crimping the edges. Roll out and cut strips for the lattice. Sprinkle the almond-sugar mixture evenly over the bottom, then give the cherries a stir and pour them on top, dotting with the butter. Weave your lattice strips gently over the cherries, tucking the ends in against the crust wall. Brush the lattice strips and crust with the egg wash, and sprinkle generously with the coarse sugar (this is a fairly tart pie, so be ridiculously generous to have lots of crunchy sugar to offset). Place in the oven, and bake until the crust is well browned and the juices are bubbling and thickening, ~1 hour (start checking before that). Allow to cool for 2 hours before cutting and devouring. If there are any leftovers, leave them, covered, at room temperature for up to a day or so.

Tuesday, July 05, 2011

Fresh Pasta


Before I finally succumbed to Book Club Failure and set aside Bleak House, I came across the following exchange, when the character Richard gets back a sum of money that he hadn't expected to:

'My prudent Mother Hubbard, why not?' he said to me, when he wanted, without the least consideration, to bestow five pounds on the brickmaker. 'I made ten pounds, clear, out of the Coavinses' business.'
'How was that?' said I.
'
Why, I got rid of ten pounds which I was quite content to get rid of, and never expected to see any more. You don't deny that?'

'No,' said I.

'Very well! then I came into possession of ten pounds-'

'The same ten pounds,' I hinted.

'That has nothing to do with it!' returned Richard. 'I have got ten pounds more than I expected to have, and consequently I can afford to spend it without being particular.'


After Richard is talked out of giving the brickmaker those five pounds, he then adds that sum to his perceived credit as well. The narrator is frustrated, but I totally understand -- much of my life involves such ridiculous calculations, quantifying the world according to an entirely subjective mental math. You don't treat yourself to the massage you considered getting, and suddenly you have 'saved' money! Thus if you spend half the cost of a massage on, say, a nice dinner out, you haven't spent money at all! You've been a thrifty saver! These sorts of indefensible calculations and categorizations define much of how I financially interact with the outside world.

Perhaps the best illustration is what I like to call the Standard Burrito Unit (a concept developed in partnership with my burrito-making neighbor). To whit: burritos from the taco truck near my house are cheap. Ridiculously cheap. For $4.50, you get a hefty tortilla-wrapped handful of rice, beans, cheese, tomato, cilantro, onions, lettuce, and avocado. Avocado! For $4.50! And thus, $4.50 has become the new standard.

Sometimes, when I'm sweating over a home-cooked meal, I stop to ask myself: is this cheaper than a burrito? Other times, I'll pick up a dress at the thrift shop, amazed that it doesn't cost more than a couple of burritos. It's a hard habit to drop.

And thus, when I was at the farmer's market and saw someone selling Oregon black truffles, I was shocked to find that a single, stinky-ripe truffle, that emblem of luxury, cost the same price as a burrito. A single Standard Burrito Unit. I bought it.

But then there was the question of what to do with it. Usually truffles are enjoyed in basic creamy preparations, which serves as an unobtrusively rich backdrop for the truffle funk. Softly set eggs or cheesy risotto both work perfectly. But to serve to the dairy-free diner, I had to find something else. Pasta seemed a good fit, but how could I waste a luxurious truffle (though still the same price as a burrito!) on plain supermarket pasta! So I made my own.

For the most part, my feelings about making pasta by hand mirror my feelings about sewing a quilt. I've made both of these things, and I've been inordinately proud of the end results (which are miles beyond the commercially-produced option). But once the task is done, I'm content to not do it again for another year or so. Except that the fusty aroma of the truffle convinced me to break out the past machine. And it wasn't as bad as I remembered -- in fact, the whole meal came together in just over an hour.

Pasta-making is definitely a bit tedious, and requires a pasta maker (unless you're much more skilled/patient/Italian than I am), but it's also an amazing transformation of humble ingredients. I went with a particularly yolk-rich version, and white flour instead of semolina (because that's what I had). After a quick mix, a rest, and a whole lot of cranking, eggs and flour turn into noodles that manage to be both rich and delicate in the same bite. Add a glug of olive oil and a grating of Oregon black truffles, and you've got a showstoppingly good meal. For less than the cost of a burrito.


Fresh Pasta (with or without truffle)
serves ~4

2 cups flour
hefty pinch salt
2 eggs
4 egg yolks

In a large bowl, sift together the flour and salt. Make a well in the center, and add the eggs and yolks. Mix, from the center outward, and knead until the dough comes together and is smooth and elastic (truth told, I often resort to the dough hook for this stage). You can add more flour or egg yolk as needed to create a firm yet pliable dough. When the dough has been well-kneaded, cover with a towel or overturned bowl, and allow to rest for half an hour.

After half an hour, set a bowl of salted water to boil. Roll and cut the dough on a pasta machine, according to the directions (my lazy cook's trick: pinch of lumps of dough that are double the walnut size recommended -- you can get several turns through the machine with one portion, then just divide it in half when it gets too large and unwieldy, making sure to cover the unused portion so that it doesn't dry out). Toss cut noodles with additional flour so that they don't stick together. When your pasta has been rolled and cut, simmer in the salted water until done (it'll take less time than you'd think), then drain and toss with olive oil. Serve with your favorite sauce (or truffles).

Sunday, June 26, 2011

Kentucky Butter Cake (aka Wedding Cupcakes)


Yesterday, my next-door neighbors—and dear, dear friends—got married. It was a lovely ceremony, on top of a defunct volcano up the hill from our house, full of green trees and a distant mountain and good friends and so much love that I think my heart exploded a little bit. And cupcakes.

I spent the last several weeks baking batch after batch of cupcakes, wrapping them well and stashing them deep in the freezer (and the freezers of others when I ran out of space). I learned more than I thought there was to know about frosting, from using an Italian meringue in the service of a not-too-sweet-and-meltproof buttercream, to white chocolate's ability to secretly stabilize a June-proof cream cheese frosting (thanks, Cake Bible!). I baked rich, moist chocolate cupcakes; tangy, summery lemon-yogurt-strawberry cupcakes; and the cake I hadn't had since I left high school: Kentucky Butter Cake.

This recipe comes from the bakery where I worked as a teenager, and tastes the way you remember childhood yellow cakes tasting (instead of the disappointing, one-dimensional sugar bombs they seem to have become). These are rich and buttery (natch), drenched in a syrupy glaze (when they're not also enrobed in buttercream), but light from careful preparation and the lovely lift of buttermilk. But who wants to talk about cupcakes? It's really about love.

But it's hard to find the words to capture that. So I'll leave you with those of James Salter:

Life is weather. Life is meals.
Lunches on a blue checked cloth on which salt has spilled.

The smell of tobacco. Brie, yellow apples, wood-handled knives.


Happy wedding, and happy happy life to my loves. And cupcakes for everyone.


Kentucky Butter Cake (aka wedding cupcakes)

adapted from The Baker's Cafe

yields a 9” bundt cake, or 24 cupcakes


Cake:
3 cups flour
1 tsp baking powder
½ tsp baking soda
heaping ½ tsp salt
1 cup butter, softened to room temperature
2 cups sugar
4 eggs (best if these are at room temperature)
2 tsp vanilla
1 cup buttermilk (best if this is at room temperature)

Glaze:
½ cup sugar
¼ cup butter
1 ½ tsp vanilla
2 Tbsp water

Preheat your oven to 350. Grease and flour a 9” bundt pan, or place liners in 2 dozen muffin cups. Set aside.

Sift together the flour, baking powder, baking soda, and salt. Set aside.

Using an electric mixer, beat the softened butter until light and fluffy. Add the sugar, and beat until light and fluffy again, stopping a few times to scrape down the sides. Add the eggs, one by one, beating well after each addition and scraping down the sides regularly. Add the vanilla, and mix well.

Lower the speed of the mixer, and add 1/3 of the dry mixture, mixing on low until just barely combined (stop just shy of a uniform mixture to avoid over-mixing), and scrape down the sides/bottom to enure there are no un-mixed pockets. Add half of the buttermilk, and again mix until barely combined. Repeat the process, adding half of the remaining flour mixture, all of the remaining buttermilk, and then all of the remaining dries. Pour into the prepared bundt or cupcake pans, and bake until a tester comes out clean (~50 minutes for a bundt cake, ~20 for cupcakes).

While the cake is baking, prepare the glaze. Combine all of the glaze ingredients in a medium saucepan. When the cake comes out of the oven, stir and simmer the glaze until the mixture begins to bubble. Pour the warm glaze over the warm cake in its pan.